Showing posts with label project. Show all posts

Wednesday, April 4, 2012

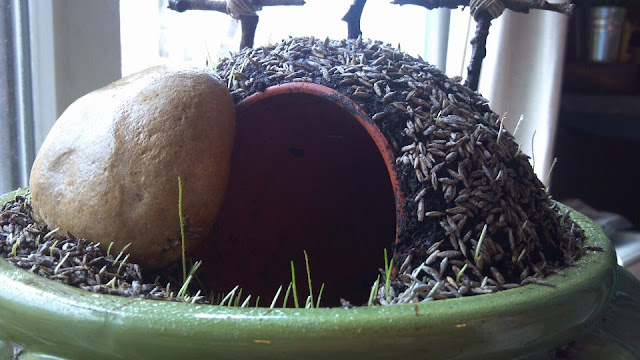
hill of calvary


i'm back! 
but not with my collages. :/
i have one done and the other one almost done, but i'm easily distracted 
and really wanted to show you guys our 
hill of calvary 
progression in pictures.
a good friend of mine posted this idea to my facebook page, 
and i didn't have a tutorial, so i just went by the picture and what i could find around the house.
total cost: free
the pot was $1.00 from a garage sale years ago
i had dirt, grass seed, a rock, sticks for crosses and a small pot already in my possession.
that never happens, you guys.
i'm always missing something, it seems like!
i hope you like it.

day 1


day 5


day 7

day 8


day 9


day 14

day 15

isn't that fun!?  
i was so worried that the seeds wouldn't sprout because i didn't cover them with dirt, but VOILA! 
5 days and they were a sproutin'!
we kept a spray water bottle near and watered it at least three times a day.
to see a more detailed tutorial, click here.


as you can see, we had to give it a good hair cut so that when good friday comes, we can place Jesus in the tomb and roll the stone over.
then on sunday, we'll roll the stone back and 
REJOICE
that our Savior is indeed 
RISEN! 
so much fun!


"He is not here: for he is risen, as he said. Come, see the place where the Lord lay."
Matthew 28:6


xo,
mary


Friday, March 16, 2012

good eats on friday

hellooo!
so, how many of you are LOVING this weather?
it is seriously such a blessing.
windows open, birds chirping, fresh air!  yay!
i totally love how the house smells with windows open.
so fresh!

i also love how my house smells when i make this:


veggie and black bean fried tortilla
original name, huh?


what you will need: 

whole wheat tortillas
{preferably homemade, mine weren't...i have a 'thing' with preservatives}
1 onion
1 green pepper
1 TBS minced garlic{but i like garlic!}
1 can black beans{or 2}
mayo or sour cream
tomatoes
avocados
spinach
shredded cheddar cheese
pico de gallo or any salsa


step 1:
fry up your onion, green pepper and garlic

step 2:
add a can{or 2} black beans
let beans get warmed up{that's my technical term}

step 3:
start layering your cooked mixture onto a tortilla,
adding toppings of your choice
we chose tomatoes, avocados, cheddar cheese, spinach
and mayo
{but mi familia didn't like the mayo, so sour cream would be good, too}


step 4:
carefully fold tortilla in half and place in preheated{on medium} frying pan with about one teaspoon of coconut oil
let cook for about one minute{or less} and flip
this will just gently brown your tortilla, give it a crunch, and melt your cheese.


step 5:
garnish with salsa and take a picture of your food two seconds before your husband has to wolf it down to be out the door!

i hope you try this! 
it is delish and easy, and healthy and all that good stuff.

i ate something similar to this at a coffee house/cafe and thought i had died and gone to Heaven.
they revamped the menu and now they only serve sweet or savory crepes.
boo.
no worries, you can make it at home.  :)

oh, and guess what?
all of this fresh air{and wal-mart's new supply of burlap}
got me all in a crafty mood.
here's a sneak peek at what i made.
it's been on the list for quite a while now.


i hope that you all have a fantastic weekend!


xo,
mary


linking up with Becky
feed my family friday 


Wednesday, October 26, 2011

light hut

how are you all doing today?

i might need an extra cup of coffee this morning.
how about you?
waking up to darkness makes it really hard for me to get in gear.

so, i am totally behind on blogging this home school life of mine,
but at the beginning of the year, my girls started studying botany.
it has really captured their attention and they love doing all the projects.
{let me just say, that if all my children were still little people, all of these projects just wouldn't work out.
that would mean i would have to hunt down materials and be on damage control all while trying to actually create the project.}
that could result in tired, crabby, stressed mommy.
i know my limits, friends. :)
most days, anyway.

now that the girls are older and able to work together{and do a lot of the hunting and creating},
 it has been really fun watching them learn.
 seeing them studying, collecting things from outdoors,
and putting together these projects is awesome.

enter: building your own light hut

i had to laugh when i saw this, because i happen to have a brown thumb.
for real.
i cannot keep a plant alive to save my soul!
i have one small african violet that is actually thriving in my kitchen but i really don't know why or how?
it must be drought tolerant and need zero thoughts or care, because that is about all the time i can give it right now.
:)

build your own light hut...
it's easy!

you will need
*a box
*aluminum foil
*plastic lid of a sour cream container{or whatever}
*heavy duty tape
*scissors/knife
*light adaptor kit
*15 watt fluorescent lightbulb
*small clay pots
*seeds 
*potting soil and moss


first you will need to cut a hole through the top of the box and plastic lid the size of your light adapter kit. 
do you see the hole below?
i used a kitchen knife.
you may or may not want to use something sharper so you don't have to saw like i did.  ;)


then you will need to line your box with aluminum foil.
we  elly used tape to secure it to all sides.


the messy reality.


i was totally excited that i had an ikea hemma light kit that i found at a local flea market for $4.00 on hand.
you never know when you will need an extra light kit, right?


elly put the light kit through the holes in the plastic container and top of the box and lit her{the hut} up!
well, after planting the seeds that we had on hand.


then she covered the front of it with a simple aluminum foil 'curtain' and we waited...


within ONE week, we had sprouts and we were SO excited!
of course, my camera doesn't take close up pics, so here is where we are at today.

four weeks later.


there are actual peas on that vine, friends!!!


pretty cool, huh?  

it is an understatement to say that we are a tad proud of our light hut.
and to think that we did so little.
God's design never ceases to amaze me!

i missed {virtual} coffee yesterday, but i am still linking up with amy.

*disclaimer*
home schooling is a wonderful, wonderful thing for our family, 
but it does not come without it's trials and errors.
take this morning for example.
bickers that led to fighting, which led to pinching, and then tears.
lots of tears.
oh, and yelling.
thus the phone call to the principal{aka DAD}.
yikes!
thank the Lord for grace and forgiveness! 
i don't want you to think that all is beautiful and pefectly project'y' all the time.
just so ya know. :)


until next time!

xo,


Photobucket

Friday, September 30, 2011

crayon wreath

good morning!
last week i was itching to do a project with my youngest{who's 5}.
i stumbled upon this adorable crayon wreath that i thought would be so fun, cheap and easy to make!
yes, cheap.  
because it matters.  :)

we started off with a large cardboard box.
i used a platter from my kitchen to trace a nice circle.
you know i couldn't free hand a perfect circle!
then i traced a plate for the smaller circle, and started sawing it out with a knife.
{hank was not involved in this although he tried}
sorry about the blurry pics...i'm still campaigning for a new camera.  
hubby, not. so. much.  :)


next, i had some scrap twill fabric that i simply ripped into strips and started hot gluing to the cardboard.


hank and the said wrapped circle of cardboard..
he couldn't wait to get to the gluing part!


ok! then we began gluing.
i added the glue, and i let him put on the crayons.
well, some of them. {after he dumped all the boxes out and got all the crayons mixed up}
oy.
i decided to go in the rainbow pattern.
just because. :)


progress.
my daughter laid out all the crayons in order so it would go faster. :)


once all the crayons were on, i followed a simple tutorial from Tatertots and Jello to make the rosette flowers.
then we just hot glued them on.
i think the girls and i {might be} addicted to making these in any size, shape, and color.
seriously. they are so fun and adorable.
the possibilities are endless for what you can do with them!
oh, and they are cheap!
love cheap.


tadaaaa!!!!


i love jute so i used some braided jute to hang it with and for one of the flowers.


having the attention span of, well, a 5 year old, hank ducked out early and started shooting with his $.75 camera from the thrift store.
yes, friends, we don't buy toys, we buy people's old stuff{wash it first} and the kids love it.
hours of enjoyment!


now i think you should make one.
it's guaranteed to brighten your day!
hank{being the philanthropist he is} decided to give his wreath away to a very special friend. 
i love that he is such a giver.  :)
now we are going to make a new one.
who knows where it will end up.  :)

i only spent around $5 to make this fun, festive wreath{if that}.
it was super fun, easy, and the time with the kids is priceless.

what you'll need to make your  crayon wreath:

*cardboard{or any flattish wreath form}

*scissors/knife/box cutter

*crayons{i needed 3 boxes @ $.45 a piece from walmart}

*scrap fabric to wrap the cardboard with
{or spray paint}

*hot glue gun and lots of glue sticks

*fabric to make rosettes

*buttons to embelish{optional}

*ribbon, jute or fabric to hang it.


i couldn't resist adding jack in here with his vintage polaroid form the thrift.  $.75! woo!
i have already claimed dibs on it when they tire of it.  :)
have a wonderful day, friends!


xo,


 "For I am persuaded
that neither death, nor life, 
nor angels, 
nor principalities, 
nor powers, 
nor things present
nor things to come
Nor height, 
nor depth, 
nor any other creature, 
shall beable to separate 
us from the love of 
God, which is in 
Christ Jesus our Lord."
Romans 8:38-39

Meet Virginia Design